关于Chrome插件想必用Chrome浏览器的童鞋都很清楚,不过这标题写的说实话有点让人晕,要解释清楚标题,首先要了解一下Chrome插件的安装机制。
Chrome插件安装机制
目前据我的了解,你可以用这3种方法安装Chrome插件
- 在Chrome Web Store查找插件或者是打开某一个插件在Chrome Web Store上的链接,点击安装即可,这是最常用最通用的方法
- 获得扩展名为crx的插件 > 打开Chrome浏览器的扩展程序页面 > 将获得的文件直接拖拽至上一步所述页面 > 安装
- 拥有插件的zip压缩包 > 解压文件 > 打开Chrome浏览器的扩展程序页面 >启用开发者模式 > 点击“加载正在开发的扩展程序”并选择刚才解压出来的文件目录
然而本文所介绍的插件安装方法并不属于上述任意一种,这就是下面要说的第4种安装方法
内联安装(Inline Installation)
这内联安装我用一句话概括就是:你制作了一个插件并且已经在Chrome Web Store上发布,同时你还想让你网站内的用户也能够直接在你的网站上安装插件而不用再跑到Chrome Web Store那里。
如果还是不太明白的话可以看看下面人家官方的原文吧
Once you’ve published your app or extension, you may be wondering how users will find and install your app. For users who browse the Chrome Web Store and find your item, its a very easy one-click process to install it. However, if a user is already on your site, it can be cumbersome for them to complete the installation – they would need to navigate away from your site to the store, complete the install process, and then return.
As of Google Chrome 15, you can initiate app and extensions installations “inline” from your site. These apps and extensions are still hosted in the Chrome Web Store, but users no longer have to leave your site to install them.
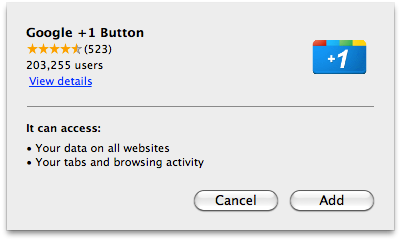
When users install the app, they will see an installation confirmation dialog similar to the one pictured on right. Just like the dialog displayed when installing directly from the Chrome Web Store, it lists all of the permissions that your app or extension is requesting. Additionally, this dialog includes the average Chrome Web Store rating and the number of users, giving users extra confidence about what they are about to install.
内联安装的必要条件
- 插件已经在Chrome Web Store上发布
- 内联安装的页面地址必须是插件在Chrome Web Store上发布时所关联网站的子域或子页面(比如插件发布时关联的网站是http://www.zenoven.com,那么内联安装页面的地址可以是http://chrome-extensions.www.zenoven.com或者http://www.zenoven.com/chrome-extensions)
内联安装页面的制作
1、在页面的head内插入一个Chrome Web Store link
即将下面的代码插入页面<head></head>之间
<link rel=”chrome-webstore-item” href=”https://chrome.google.com/webstore/detail/itemID“>
itemID可以在打开一个插件的Chrome Web Store链接后找到,下面是我的查看源码Chrome插件的link
<link rel=”chrome-webstore-item” href=”https://chrome.google.com/webstore/detail/ggkbiakmiljlbbfhjajlpjgckcjanbab“>
2、触发内联安装
原文里面写的比较多,按照我的理解其实很简单也就是用JS写些判断代码,增强用户体验,下面是我个人的一些逻辑步骤
- 在页面合适的地方插入一个按钮或链接或者是你想用的元素,用于触发安装,这里假设为一个button
- 用JS判断浏览器是否是Chrome,如果不是则将button设为disabled并且button内的文本修改为“只适用于Chrome浏览器”,如果是的话就直接进入下一步
- 判断该插件是否已安装,如果已安装则修改button文本为“已安装”并且设为disabled,如果未安装则进入下一步
- 调用安装函数,修改button文本为“正在安装…”并且设为disabled
- 根据安装结果修改button(安装成功则修改button文本为“安装成功”并且设为disabled,否则将button状态及文本恢复到点击button之前)
说了那么多,其实就是这段JS代码(需jQuery,另外上面所说的button已经在页面内插入,并且button的id为install-button)
(function($){
  var e = $('#install-button')
    ,originalText = e.html()
    ,itemURL = $('link[rel=chrome-webstore-item]').attr('href')
    ,isChrome = /chrom(e|ium)/.test(navigator.userAgent.toLowerCase());
  checkAndSetButton();
  e.click(function(){
    e.html('正在安装...').attr('disabled',true);
    chrome.webstore.install(
      itemURL
      ,function(){
        e.html('安装成功!').attr('disabled',true);
      }
      ,function(){
        e.html(originalText).attr('disabled',false);
      }
    );
  });
  function checkAndSetButton(){
    if(isChrome){
      if (typeof chrome !== "undefined" && typeof chrome.app !== "undefined" && chrome.app.isInstalled) {
        e.html('已安装').attr('disabled',true);
      }
    }else{
      e.html('只适用于Chrome浏览器').attr('disabled',true);
    }

  }
})(jQuery);
好了,上面就是独立网站启用Chrome插件内联安装教程的主要内容了。
PS:有的童鞋可能会问怎么样才能在指定页面的指定位置插入任意代码呢?我的办法是安装一个插件:Code Insert Manager ,该插件就可以在不改动任何代码的情况下完成上述任务。
另附一些我制作的Chrome插件:
科普了